PointerEvent指针事件
指针事件
早期的浏览器,只存在鼠标事件(MouseEvent)。后来,以智能手机和平板电脑为首的触屏设备开始普及,交互方式发生了改变。但为了使现有功能不受影响,在很多情况下,触摸事件和鼠标事件会相继触发(以使非触摸专用的代码仍然可以与用户交互)。例如轻触屏幕会触发 touchstart 事件,如果不调用 event.preventDefault()会继续触发 mousedown 事件。但在面对多点触控的时候,鼠标事件就显得无能为力了。因此,引入了触摸事件(TouchEvent)。不过这还不够完美,因为很多其他输入设备(如触控笔)有自己的特性。如果此时推出基于触控笔的 API,那后面万一又有新特性的输入设备出现时,又怎么办呢?而且同时维护两份处理鼠标事件和触摸事件的代码已经很笨重了。面对这些问题,W3C 急需一套能够整合输入事件的 API,指针事件应运而生。指针事件(PointerEvent)是 HTML5 的事件规范之一,它主要目的是用来将鼠标(Mouse),触摸(Touch)和触控笔(Pen)三种事件整合为统一的 API。
指针事件属性
指针事件属性继承自 MouseEvent 和 Event。常用属性例如:clientX,clientY 等都有。下面简单介绍指针事件独有的属性。
| 属性 | 介绍 |
|---|---|
| pointerId | 触发事件的指针的唯一提示 |
| width | 指针的接触面的 CSS 像素宽度 |
| height | 指针的接触面的 CSS 像素高度 |
| pressure | 归一化后的指针压力值,范围在 0-1 之间 |
| tangentialPressure | 归一化后的切向压力值,范围在-1-1]之间,0 表示控制设备中立状态时的值 |
| tiltX | 由输入设备(如手写笔)与 Y 轴的构成平面,和 YZ 平面之间的夹角,范围在-90-90 之间 |
| tiltY | 由输入设备(如手写笔)与 X 轴构成平面,和 XZ 平面之间的夹角,范围在-90-90 之间 |
| twist | 输入设备(如手写笔)围绕自身价值范围旋转的角度,范围在 0-359 之间 |
| pointerType | 表示触发事件的设备类型,mouse,pen,touch |
| isPrimary | 表示一个指针是否是当前设备类型的主指针 |
指针事件类型
| MouseEvent | TouchEvent | PointerEvent |
|---|---|---|
| mousedown | touchstart | pointerdown |
| mousemove | touchmove | pointermove |
| mouseup | touchend | pointerup |
| touchcancel | pointercancel | |
| mouseenter | pointerenter | |
| mouseleave | pointerleave | |
| mouseover | pointerover | |
| mouseout | pointerout | |
| gotpointercapture | ||
| lostpointercapture |
使用方式
MouseEvent
我们一般对于 MouseEvent 事件会这样处理:
html
<html>
  <body>
    <div id="box"></div>
  </body>
  <script>
    const box = document.getElementById('box')
    let isMouseDown = false
    // 将mousedown事件绑定到box元素上
    box.addEventListener('mousedown', function (e) {
      isMouseDown = true
    })
    // 将mousemove事件绑定到document或window上,防止移动过快丢失目标元素
    document.addEventListener('mousemove', function (e) {
      if (isMouseDown) {
        // todo
      }
    })
    // 将mouseup事件绑定到document或window上,防止在目标元素外释放鼠标
    document.addEventListener('mouseup', function (e) {
      isMouseDown = false
    })
  </script>
</html>
上述处理方式的问题在于,鼠标在文档周围的移动可能会引起副作用,触发其他元素的事件处理程序。
TouchEvent
html
<html>
  <body>
    <div id="box"></div>
  </body>
  <script type="text/javascript">
    const box = document.getElementById('box')
    let point = { x: 0, y: 0 }
    let point2 = { x: 0, y: 0 }

    box.addEventListener('touchstart', function (e) {
      point = { x: e.touches[0].clientX, y: e.touches[0].clientY }
      // 第二个触摸点
      if (pointers.length > 1) {
        point2 = { x: e.touches[1].clientX, y: e.touches[1].clientY }
      }
    })

    box.addEventListener('touchmove', function (e) {
      const current = { x: e.touches[0].clientX, y: e.touches[0].clientY }
      // 第二个触摸点
      if (e.touches.length > 1) {
        const current2 = { x: e.touches[1].clientX, y: e.touches[1].clientY }
      }
    })

    box.addEventListener('touchend', function (e) {})

    box.addEventListener('touchcancel', function (e) {})
  </script>
</html>
相对于鼠标事件需要将 mousemove,mouseup 绑定到 document 上,防止丢失目标元素的问题,在触摸事件中则不会发生。因为 touchmove,touchend,touchcancel 事件的目标和触发 touchstart 事件的目标元素相同。
PointerEvent
对于MouseEvent存在的问题,指针事件有对应的解决方法,就是Element.setPointerCapture()。我们可以在pointerdown事件处理程序中调用box.setPointerCapture(e.pointerId),这样接下来所发生的事件(例如pointerenter,pointerleave,pointerout,pointerover,pointerup,pointercancel)都会被重定向到 box 上。具体使用如下:
html
<html>
  <body>
    <div id="box"></div>
  </body>
  <script type="text/javascript">
    const box = document.getElementById('box')
    let isPointerDown = false
    box.addEventListener('pointerdown', function (e) {
      isPointerDown = true
    })
    box.addEventListener('pointermove', function (e) {
      box.setPointerCapture(e.pointerId)
      if (isPointerDown) {
        // todo
      }
    })
    box.addEventListener('pointerup', function (e) {
      isPointerDown = false
    })
    box.addEventListener('pointercancel', function (e) {
      isPointerDown = false
    })
  </script>
</html>
提示
如果在移动端使用,请给 box 元素添加 touch-action: none;
多点触控
我们使用 TouchEvent 实现多点触控的时候,event 会返回touches属性,该属性会列出所有当前在与触摸表面接触的 Touch 对象,不管触摸点是否已经改变或其目标元素是在处于 touchstart 阶段。但指针事件并没有类似的属性,而是需要我们自己处理。具体实现如下:
html
<html>
  <body>
    <div id="box"></div>
  </body>
  <script type="text/javascript">
    const box = document.getElementById('box')
    let pointers = []
    let point = { x: 0, y: 0 }
    let point2 = { x: 0, y: 0 }
    box.addEventListener('pointerdown', function (e) {
      // 维护一个数组,用于记录当前触摸点
      pointers.push(e)
      point = { x: pointers[0].clientX, y: pointers[0].clientY }
      // 第二个触摸点
      if (pointers.length > 1) {
        point2 = { x: pointers[1].clientX, y: pointers[1].clientY }
      }
    })
    box.addEventListener('pointermove', function (e) {
      handlePointers(e, 'update')
      const current = { x: pointers[0].clientX, y: pointers[0].clientY }
      if (pointers.length > 1) {
        const current2 = { x: pointers[1].clientX, y: pointers[1].clientY }
      }
    })
    box.addEventListener('pointerup', function (e) {
      handlePointers(e, 'delete')
    })
    box.addEventListener('pointercancel', function (e) {
      pointers = []
    })

    /**
     * 处理指针
     * @param {PointerEvent} e
     * @param {string} type
     */
    function handlePointers(e, type) {
      for (let i = 0; i <script pointers.length; i++) {
        if (pointers[i].pointerId === e.pointerId) {
          if (type === 'update') {
            pointers[i] = e
          } else if (type === 'delete') {
            pointers.splice(i, 1)
          }
        }
      }
    }
  </script>
</html>
双指缩放原理
双指向外扩张表示放大,向内收缩表示缩小,缩放比例是通过计算双指当前的距离 / 双指上一次的距离获得的。详见下图:
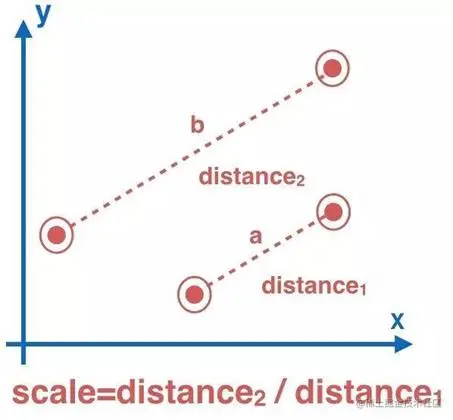
计算出缩放比例后再通过 transform 进行缩放
两点间距离公式
设两个点 A、B 以及坐标分别为 A(x1, y1)、B(x2, y2),则 A 和 B 两点之间的距离为:

js
/**
 * 获取两点间距离
 * @param {object} a 第一个点坐标
 * @param {object} b 第二个点坐标
 * @returns
 */
function getDistance(a, b) {
  const x = a.x - b.x
  const y = a.y - b.y
  return Math.hypot(x, y) // Math.sqrt(x * x + y * y);
}
中点坐标公式
设两个点 A、B 以及坐标分别为 A(x1, y1)、B(x2, y2),则 A 和 B 两点的中点 P 的坐标为:

js
/**
 * 获取中点坐标
 * @param {object} a 第一个点坐标
 * @param {object} b 第二个点坐标
 * @returns
 */
function getCenter(a, b) {
  const x = (a.x + b.x) / 2
  const y = (a.y + b.y) / 2
  return { x: x, y: y }
}
获取图片缩放尺寸
js
const image = document.getElementById('image')

let result, // 图片缩放宽高
  x, // x轴偏移量
  y, // y轴偏移量
  scale = 1, // 缩放比例
  maxScale,
  minScale = 0.5

// 由于图片是异步加载,需要在load方法里获取naturalWidth,naturalHeight
image.addEventListener('load', function () {
  result = getImgSize(image.naturalWidth, image.naturalHeight, window.innerWidth, window.innerHeight)
  maxScale = Math.max(Math.round(image.naturalWidth / result.width), 3)
  // 图片宽高
  image.style.width = result.width + 'px'
  image.style.height = result.height + 'px'
  // 垂直水平居中显示
  x = (window.innerWidth - result.width) * 0.5
  y = (window.innerHeight - result.height) * 0.5
  image.style.transform = 'translate3d(' + x + 'px, ' + y + 'px, 0) scale(1)'
})

// 图片赋值需放在load回调之后,因为图片缓存后读取很快,有可能不执行load回调
image.src = '../images/xxx.jpg'

/**
 * 获取图片缩放尺寸
 * @param {number} naturalWidth
 * @param {number} naturalHeight
 * @param {number} maxWidth
 * @param {number} maxHeight
 * @returns
 */
function getImgSize(naturalWidth, naturalHeight, maxWidth, maxHeight) {
  const imgRatio = naturalWidth / naturalHeight
  const maxRatio = maxWidth / maxHeight
  let width, height
  // 如果图片实际宽高比例 >= 显示宽高比例
  if (imgRatio >= maxRatio) {
    if (naturalWidth > maxWidth) {
      width = maxWidth
      height = (maxWidth / naturalWidth) * naturalHeight
    } else {
      width = naturalWidth
      height = naturalHeight
    }
  } else {
    if (naturalHeight > maxHeight) {
      width = (maxHeight / naturalHeight) * naturalWidth
      height = maxHeight
    } else {
      width = naturalWidth
      height = naturalHeight
    }
  }
  return { width: width, height: height }
}
双指行为的判断
js
document.addEventListener('touchmove', function (event) {
  if (event.touches && event.touches.length == 2) {
    console.log('双指在移动')
  }
})
event.touches 中的每一项都是触摸点对象,包含了触碰的元素以及触摸点的坐标。
触摸点的坐标就可以用来计算缩放比例。
我们记录下第一次双指行为发生时候的两个手指点的坐标值,于是就可以计算出这两个指头之间的距离;
然后继续 touchmove 的时候,实时计算出新的两个手指的坐标距离。
一开始的距离/现在的距离 = 应该缩放的比例。
实例
js
var eleImg = document.querySelector('#image')
var store = {
  scale: 1,
}
// 缩放事件的处理
eleImg.addEventListener('touchstart', function (event) {
  var touches = event.touches
  var events = touches[0]
  var events2 = touches[1]

  event.preventDefault()

  // 第一个触摸点的坐标
  store.pageX = events.pageX
  store.pageY = events.pageY

  store.moveable = true

  if (events2) {
    store.pageX2 = events2.pageX
    store.pageY2 = events2.pageY
  }

  store.originScale = store.scale || 1
})
document.addEventListener('touchmove', function (event) {
  if (!store.moveable) {
    return
  }

  event.preventDefault()

  var touches = event.touches
  var events = touches[0]
  var events2 = touches[1]
  // 双指移动
  if (events2) {
    // 第2个指头坐标在touchmove时候获取
    if (!store.pageX2) {
      store.pageX2 = events2.pageX
    }
    if (!store.pageY2) {
      store.pageY2 = events2.pageY
    }

    // 获取坐标之间的举例
    var getDistance = function (start, stop) {
      return Math.hypot(stop.x - start.x, stop.y - start.y)
    }
    // 双指缩放比例计算
    var zoom =
      getDistance(
        {
          x: events.pageX,
          y: events.pageY,
        },
        {
          x: events2.pageX,
          y: events2.pageY,
        }
      ) /
      getDistance(
        {
          x: store.pageX,
          y: store.pageY,
        },
        {
          x: store.pageX2,
          y: store.pageY2,
        }
      )
    // 应用在元素上的缩放比例
    var newScale = store.originScale * zoom
    // 最大缩放比例限制
    if (newScale > 3) {
      newScale = 3
    }
    // 记住使用的缩放值
    store.scale = newScale
    // 图像应用缩放效果
    eleImg.style.transform = 'scale(' + newScale + ')'
  }
})

document.addEventListener('touchend', function () {
  store.moveable = false

  delete store.pageX2
  delete store.pageY2
})
document.addEventListener('touchcancel', function () {
  store.moveable = false

  delete store.pageX2
  delete store.pageY2
})